Currently, the University of Minnesota is working on our Windows 7 to 10 migration. One of the key risks identified is that user data could be lost during the transition. Our current process involves our desktop support technicians manually backing up user data, then running a wipe and reload task sequence followed by a manual restore of user data. This manually intensive process is also not very consistent.
We have decided to take a two-pronged approach to dealing with user data in such a way as to keep our data loss risk as low as possible. We will be using USMT in our task sequence to backup and restore user data along with a "just in case" complete disk image using MDT to create a WIM of the hard drive.
Using USMT
User State Migration Toolkit is fairly easy to get up and running with in any task sequence.
Before beginning to leverage USMT you’ll need to set up a state migration point. We needed to reconfigure how our boundaries were setup to leverage IP boundaries to make sure the migration point was available to the proper devices. I’d recommend reading through the Microsoft documentation on state migration as it’s a wealth of knowledge about setting up a state migration point.
Once you have your state migration point setup and working you’ll need to create a task sequence that is able to leverage USMT. We decided to do USMT in WinPE because it made everything much simpler and ran faster. There are some quirks to things that migrate offline vs online and they’re also worth considering as you build your task sequence.
Since we’re doing a re-image with the task sequence if we start in windows we want to make sure Bitlocker is suspended prior to rebooting into WinPE. We do this using the built in Disable Bitlocker step in SCCM task sequences and have it target the current operating system drive. It’s also set to continue on error to avoid some issues we had on test devices and haven’t had issues in production with this configuration.
Capturing User State
After disabling Bitlocker from Windows restart the device into WinPE and the first USMT step is to Request State Store which will look at what state store’s are assigned to the device and fail if none are found. This step should fail on error. We request the store to Capture state from the computer and try 5 times with a 60 second delay and to fail over to the network access account if the computer account fails.

Now that we have a state store we can capture our user state using the Capture User State step. You’ll need to point it to the built in User State Migration Tool for Windows package. If you don’t have this or need to generate a new package there is a built in template for it in the package wizard.

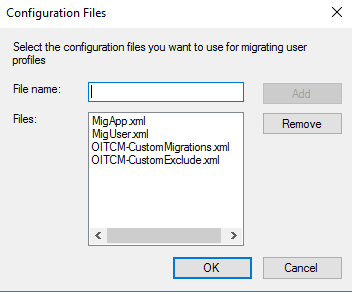
We use four files, MigApp.xml and MigUser.xml are both the standard built in configuration files provided by USMT and should already be in your USMT package. We’ve also built two custom USMT files. See below for their contents and a brief description of what they’re doing. Along with the files we’ve enabled verbose logging, skipping files that use EFS and to copy the files using offline/win-pe mode. If you’re not using offline mode you’ll want to not check this box and/or check the VSS box depending on your own scenarios and based on your own testing.
OITCM-CustomeExclude.xml as shown below is designed to not include the computer certificate in the backup (the SkipMachineCerts) section which caused issues early on in testing with some devices.
We’ve also excluded specific user data locations where we didn’t want installers and/or other files coming through. We also decided to not include any startup or start menu shortcuts as this brought over all sorts of shortcuts that were broken on the device after re-imaging.
<?xml version="1.0" encoding="UTF-8"?>
<migration urlid="http://www.microsoft.com/migration/1.0/migxmlext/customExclude">
   <component type="Documents" context="System">
      <displayName>SkipMachineCerts</displayName>
      <role role="Data">
         <rules>
            <include>
               <objectSet>
                  <pattern type="Registry">HKLM\SOFTWARE\Microsoft\SystemCertificates\My\Certificates\*[*]</pattern>
               </objectSet>
            </include>
			<unconditionalExclude>
               <objectSet>
                  <pattern type="Registry">HKLM\SOFTWARE\Microsoft\SystemCertificates\My\Certificates\*[*]</pattern>
               </objectSet>
            </unconditionalExclude>
         </rules>
      </role>
   </component>

   <!-- This component EXCLUDES the following User specific stuff-->
   <component type="System" context="user">
       <displayName _locID="miguser.User_Exclusions">User Exclusions</displayName>
       <role role="Data">
           <rules>
               <unconditionalExclude>
                   <objectSet>

                   <!-- exclude blank links on the desktop-->
                   <pattern type="File">%CSIDL_DESKTOP%\* [*.msi]</pattern>
                   <pattern type="File">%CSIDL_DESKTOP%\* [*.exe]</pattern>
                   <pattern type="File">%CSIDL_DESKTOP%\* [*.lnk]</pattern>
                   <pattern type="File">%CSIDL_DESKTOP%\* [*.lnk2]</pattern>

                   <pattern type="File">%CSIDL_DESKTOPDIRECTORY%\* [*.msi]</pattern>
                   <pattern type="File">%CSIDL_DESKTOPDIRECTORY%\* [*.exe]</pattern>
                   <pattern type="File">%CSIDL_DESKTOPDIRECTORY%\* [*.lnk]</pattern>
                   <pattern type="File">%CSIDL_DESKTOPDIRECTORY%\* [*.lnk2]</pattern>


                   <pattern type="File">%CSIDL_DEFAULT_DESKTOP%\* [*.msi]</pattern>
                   <pattern type="File">%CSIDL_DEFAULT_DESKTOP%\* [*.exe]</pattern>
                   <pattern type="File">%CSIDL_DEFAULT_DESKTOP%\* [*.lnk]</pattern>
                   <pattern type="File">%CSIDL_DEFAULT_DESKTOP%\* [*.lnk2]</pattern>


                   <pattern type="File">%CSIDL_DEFAULT_PROGRAMS%\* [*]</pattern>
                   <pattern type="File">%CSIDL_DEFAULT_STARTMENU%\* [*]</pattern>
                   <pattern type="File">%CSIDL_DEFAULT_STARTUP%\* [*]</pattern>
                   <pattern type="File">%CSIDL_PROGRAMS%\* [*]</pattern>
                   <pattern type="File">%CSIDL_STARTMENU%\* [*]</pattern>
                   <pattern type="File">%CSIDL_STARTUP%\* [*]</pattern>

                   </objectSet>
               </unconditionalExclude>
           </rules>
       </role>
   </component>

   <!-- This component EXCLUDES the following shared User specific stuff-->
   <component type="System" context="System">
       <displayName _locID="miguser.Shared_User_Exclusions">Shared User Exclusions</displayName>
       <role role="Data">
           <rules>
               <unconditionalExclude>
                   <objectSet>


                   <pattern type="File">%CSIDL_COMMON_DESKTOPDIRECTORY%\* [*.msi]</pattern>
                   <pattern type="File">%CSIDL_COMMON_DESKTOPDIRECTORY%\* [*.exe]</pattern>
                   <pattern type="File">%CSIDL_COMMON_DESKTOPDIRECTORY%\* [*.lnk]</pattern>
                   <pattern type="File">%CSIDL_COMMON_DESKTOPDIRECTORY%\* [*.lnk2]</pattern>


                   <pattern type="File">%CSIDL_COMMON_PROGRAMS%\* [*]</pattern>
                   <pattern type="File">%CSIDL_COMMON_STARTMENU%\* [*]</pattern>
                   <pattern type="File">%CSIDL_COMMON_STARTUP%\* [*]</pattern>

                   <pattern type="File">%CSIDL_PROGRAMS%\* [*]</pattern>
                   <pattern type="File">%CSIDL_STARTMENU%\* [*]</pattern>
                   <pattern type="File">%CSIDL_STARTUP%\* [*]</pattern>

                   </objectSet>
               </unconditionalExclude>
           </rules>
       </role>
   </component>
</migration>
In our OITCM-CustomMigrations.xml file as shown below we’ve set up custom migrations for several highly used applications within our environment. I’ve also left in a very specific example of how to migrate a programdata folder as that was also helpful for us. We have Firefox, Thunderbird, Chrome, Perceptive Content, Downloads, and Custom File Extensions added into the migration.
<?xml version="1.0" encoding="UTF-8"?>
<migration urlid="http://www.microsoft.com/migration/1.0/migxmlext/oitcmcustom">
    <!-- Start Firefox Migration -->
    <component type="Documents" context="User">
        <displayName>Mozilla Migration</displayName>
        <role role="Data">
            <detects>
                <detect>
                    <condition>MigXmlHelper.DoesObjectExist("File","%CSIDL_APPDATA%\Mozilla")</condition>
                </detect>
            </detects>
            <rules>
                <include filter='MigXmlHelper.IgnoreIrrelevantLinks()'>
                    <objectSet>
                        <pattern type="File">%CSIDL_APPDATA%\Mozilla\* [*]</pattern>
                    </objectSet>
                </include>
            </rules>
        </role>
    </component>

    <component type="Documents" context="User">
        <displayName>Thunderbird Migration</displayName>
        <role role="Data">
            <detects>
                <detect>
                    <condition>MigXmlHelper.DoesObjectExist("File","%CSIDL_APPDATA%\Thunderbird")</condition>
                </detect>
            </detects>
            <rules>
                <include filter='MigXmlHelper.IgnoreIrrelevantLinks()'>
                    <objectSet>
                        <pattern type="File">%CSIDL_APPDATA%\Thunderbird\* [*]</pattern>
                    </objectSet>
                </include>
            </rules>
        </role>
    </component>
    <!-- End Firefox Migration -->

    <!-- Start Chrome Migration -->
    <component type="Documents" context="User">
        <displayName>Google Chrome Migration</displayName>
        <role role="Data">
            <detects>
                <detect>
                    <condition>MigXmlHelper.DoesObjectExist("File","%CSIDL_LOCAL_APPDATA%\Google\Chrome")</condition>
                </detect>
            </detects>
            <rules>
                <include filter='MigXmlHelper.IgnoreIrrelevantLinks()'>
                    <objectSet>
                        <pattern type="File">%CSIDL_LOCAL_APPDATA%\Google\Chrome\* [*]</pattern>
                    </objectSet>
                </include>
            </rules>
        </role>
    </component>
    <!-- End Chrome Migration -->

    <!-- Start ImageNow/Perceptive Content Migration -->
    <component type="Documents" context="System">
        <displayName>Perceptive Content Migration</displayName>
        <role role="Data">
            <detects>
                <detect>
                    <condition>MigXmlHelper.DoesObjectExist("File","%CSIDL_COMMON_APPDATA%\ImageNow")</condition>
                </detect>
            </detects>
            <rules>
                <include filter='MigXmlHelper.IgnoreIrrelevantLinks()'>
                    <objectSet>
                        <pattern type="File">%CSIDL_COMMON_APPDATA%\ImageNow\* [*]</pattern>
                    </objectSet>
                </include>
            </rules>
        </role>
    </component>
    <!-- End ImageNow/Perceptive Content Migration -->

    <!-- Start ImageNow/Perceptive Content Backup Migration -->
    <component type="Documents" context="System">
        <displayName>Perceptive Content Backup Migration</displayName>
        <role role="Data">
            <detects>
                <detect>
                    <condition>MigXmlHelper.DoesObjectExist("File", "%CSIDL_COMMON_APPDATA%\ImageNow722-Archive")</condition>
                </detect>
            </detects>
            <rules>
                <include filter='MigXmlHelper.IgnoreIrrelevantLinks()'>
                    <objectSet>
                        <pattern type="File">%CSIDL_COMMON_APPDATA%\ImageNow722-Archive\* [*]</pattern>
                    </objectSet>
                </include>
            </rules>
        </role>
    </component>
    <!-- End ImageNow/Perceptive Content Backup Migration -->

    <!-- Start Downloads Migration -->
    <component type="Documents" context="User">
        <displayName>My Downloads</displayName>
        <paths>
            <path type="File">%FOLDERID_DOWNLOADS%</path>
        </paths>
        <role role="Data">
            <detects>
                <detect>
                    <condition>MigXmlHelper.DoesObjectExist("File","%FOLDERID_DOWNLOADS%")</condition>
                </detect>
            </detects>
            <rules>
                <include filter='MigXmlHelper.IgnoreIrrelevantLinks()'>
                    <objectSet>
                        <pattern type="File">%FOLDERID_DOWNLOADS%\* [*]</pattern>
                    </objectSet>
                </include>
                <merge script="MigXmlHelper.DestinationPriority()">
                    <objectSet>
                        <pattern type="File">%FOLDERID_DOWNLOADS% [desktop.ini]</pattern>
                    </objectSet>
                </merge>
            </rules>
        </role>
    </component>
    <!-- End Downloads Migration -->

    <!-- Start known file extensions -->
    <component type="Documents" context="System">
        <displayName>Custom File Extensions</displayName>
        <role role="Data">
            <rules>
                <include>
                    <objectSet>
                        <script>MigXmlHelper.GenerateDrivePatterns ("* [*.pdf]", "Fixed")</script>
                    </objectSet>
                </include>
                <exclude>
                    <objectSet>
                        <pattern type="File">%PROFILESFOLDER%\* [*]</pattern>
                        <pattern type="File">%CSIDL_WINDOWS%\* [*]</pattern>
                        <pattern type="File">%CSIDL_PROGRAM_FILES%\* [*]</pattern>
						<pattern type="File">%CSIDL_COMMON_APPDATA%\Johnson Controls\* [*]</pattern>
                        <!--We are trying to remove system files from other windows installation on the same machine-->
                        <!--This is the best guess we can come up with, in case of these folder name localized, we might not be
                         to do whatever we have intended here-->
                        <script>MigXmlHelper.GenerateDrivePatterns ("\Program Files\* [*]", "Fixed")</script>
                        <script>MigXmlHelper.GenerateDrivePatterns ("\Winnt\* [*]", "Fixed")</script>
                        <script>MigXmlHelper.GenerateDrivePatterns ("\Windows\* [*]", "Fixed")</script>
                    </objectSet>
                </exclude>
            </rules>
        </role>
    </component>
    <!-- End known file extensions -->
</migration>
Finally, once you’re all ready to go, simply add a Release State Store step and you’re done!
Restoring User State
Restoring user state is much like capturing, we need both a Request State Store step before the restore and a Release State Store added after the restore. When it comes to configuring the Restore User State step, we again point it at our USMT package and then we selected to Restore all captured user profiles with standard options. We didn’t need any additional customization on this section.
WIM Backup
To capture a WIM of the device during the task sequence as a backup you’ll need to get MDT integration if you don’t already have it. There’s good info on this on the Microsoft docs page. You’ll also need an MDT toolkit package and this guide walks you through the basics of setting up your first MDT enabled task sequence.
WIM Capture
Firstly, add a Use Microsoft Deployment Toolkit Package step if it’s not already in your task sequence. It should point to the MDT package you created either through the task sequence wizard or the package wizard.

The second step is to add a Gather step which will pull settings off the device which are then used by MDT for its various features. We set it up to just Gather only local data (do not process rules) as we didn’t need anything custom or fancy, just some info about the drives. required by one of the MDT scripts we’ll be calling later on.
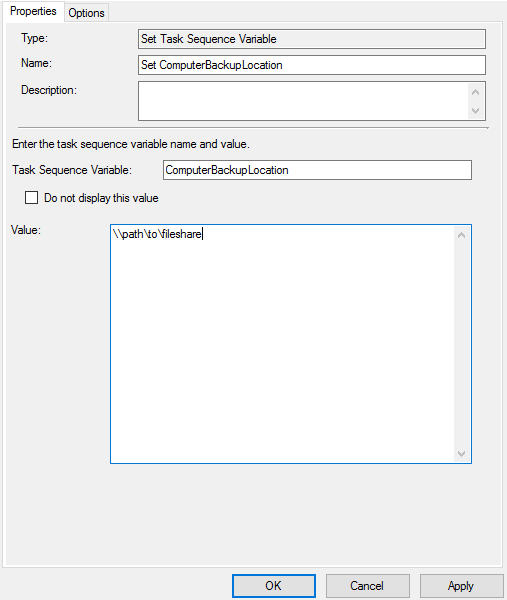
The third step is to set the task sequence variable ComputerBackupLocation to the location you want the WIM stored. This can/should be a network drive. This is a variable used by the MDT backup script to generate the WIM.
Finally we come to the stage where we can capture the WIM. We’ll need a Run Command Line step with the command cscript.exe "%DeployRoot%\Scripts\ZTIBackup.wsf" which will run the MDT WIM backup script.

And there you have it! That’s how we’re using USMT as well as MDT to capture user state and full disk images during a task sequence.
WIM Restore
If you’re looking to restore the WIM you’ve just captured, below are the steps. I would say this is not a 100% guaranteed restore and there will likely be issues. We’ve had good luck with it internally so far however.
Things to Gather Before Beginning
- WinPE Boot Media
- Windows 7 Installation Media
- External drive or network share with the WIM
Steps
- Boot into a WinPE image. The SCCM boot media will suffice for this. You’ll need to use F8 to open a command prompt and then run the diskpart command to build the appropriate partition table.
- select disk 0 (select the main disk for the system)
- Clean
- Create partition primary size=300
- Format quick fs=ntfs label=”System”
- Assign letter=”S”
- Active
- Create partition primary
- Format quick fs=ntfs label=”Windows”
- Assign letter=”C”
- Exit
- Now you’ll need to use the dism tool to apply the WIM image to use the drive.
- If you’ve stored the WIM on a network share use the net use y: \path\to\share method to mount the network share as a drive.
- Commands to run:
- dism /apply-image /imagefile:y:\path\to\image.wim /index:1 /ApplyDir:C:\
- The index can be found using the dism /Get-ImageInfo /imagefile:y:\path\to\image.wim command. This is the location within the WIM where the OS is stored. You may have additional images for other partitions of the drive.
- Now you’ll need to boot into Windows 7 installation media and choose the recovery option.
- Choose the option to mark partitions as active.
- Diskpart commmands:
- select disk disk
- select partition partition
- assign
- active
- Diskpart commmands:
- Run the following commands:
- bootrec /fixboot
- bootrec /scanos
- bootrec /fixmbr
- bootrec /rebuildbcd
- Restart the computer and re-enter the Windows 7 recovery mode on the install media
- Choose the repair Windows 7 option.
- Choose the fix startup option.
- Restart the computer and login as a local admin account.
- Unbind and rebind the computer.
